The Irresistible Allure of Roasted Garlic: A Flavor Transformation
There are few kitchen endeavors more rewarding than roasting a head of garlic. What begins as a pungent, sharp ingredient transforms into something utterly magical: sweet, creamy, caramelized cloves bursting with a mild, nutty flavor. If you've ever wondered roasted garlic how to achieve this culinary wonder, you're in the right place. This guide will walk you through the simple steps to unlock the incredible taste and versatility of roasted garlic, elevating countless dishes from the mundane to the magnificent.
Roasting garlic isn't just about cooking it; it's about a chemical alchemy. The intense heat breaks down the allicin, the sulfurous compound responsible for garlic's characteristic bite, converting it into sweeter, milder, and more complex compounds. The result is a spreadable, golden delight that loses its harshness and gains an incredible depth of flavor. It's an essential skill for any home cook looking to add a gourmet touch with minimal effort.
Roasted Garlic How-To: The Classic Oven Method (Step-by-Step)
The most common and arguably best method for roasting garlic is in the oven. It's largely hands-off, allowing the heat to gently caramelize the cloves to perfection. Here’s a detailed guide on how to roast garlic in your own kitchen.
What You'll Need:
- 1-4 whole heads of garlic (the more, the merrier!)
- 1-2 tablespoons olive oil (extra virgin preferred)
- A pinch of salt (kosher or sea salt works well)
- A pinch of black pepper (optional)
- Aluminum foil
- A small oven-safe baking dish or muffin tin (optional, but can help contain any oil leaks)
Step-by-Step Instructions:
- Preheat Your Oven: Set your oven to 400°F (200°C). This moderate heat ensures the garlic cooks through and caramelizes without burning.
- Prepare the Garlic Heads: Take each head of garlic and carefully slice off about a quarter to a third of an inch from the very top. This exposes the tips of the individual cloves, allowing the oil and heat to penetrate, but keeps the papery skin intact around the bulb to protect the cloves from drying out. You can discard the removed top portion.
- Drizzle with Olive Oil: Place each prepared garlic head onto a square of aluminum foil (large enough to wrap around the head completely). Drizzle about 1/2 to 1 teaspoon of olive oil over the exposed cloves, ensuring each cut surface gets a little oil. The oil helps with the caramelization process and prevents the garlic from drying out.
- Season (Optional, but Recommended): Sprinkle a pinch of salt and a grind of black pepper over the oiled garlic. This enhances the flavor.
- Wrap it Up: Bring the edges of the aluminum foil up and around the garlic head, creating a sealed packet. You want to trap the steam and heat inside, which helps the garlic cook evenly and become tender.
- Roast to Perfection: Place the foil-wrapped garlic heads directly on an oven rack or in a small baking dish (if you're worried about leakage). Roast for 35-50 minutes. The cooking time can vary depending on the size and freshness of your garlic.
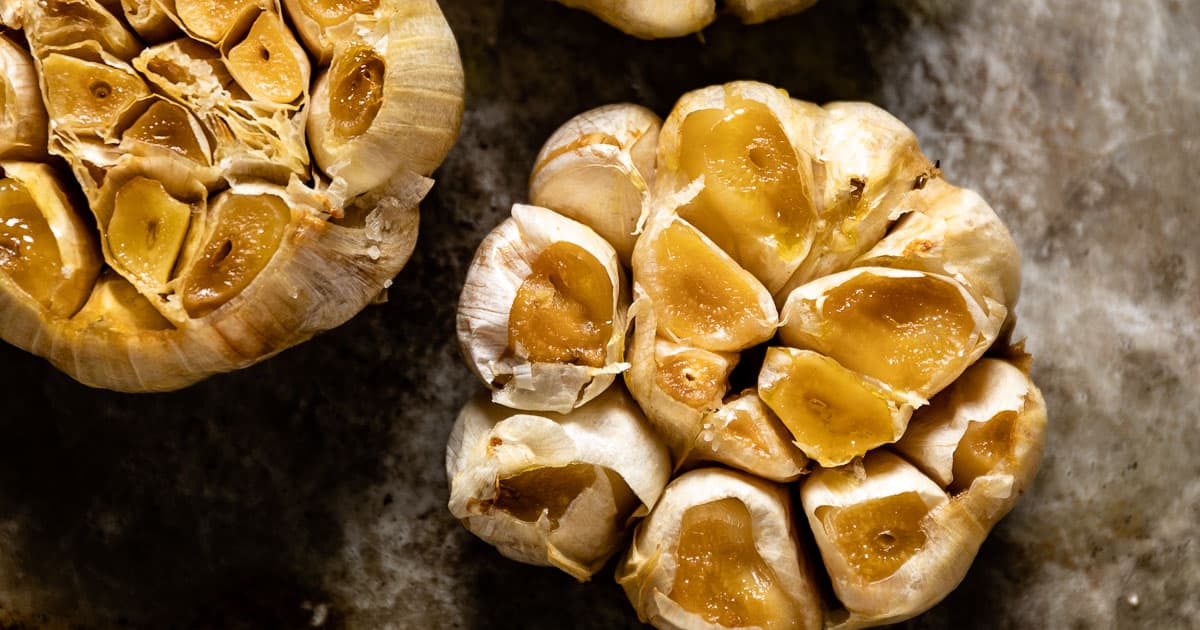
- Check for Doneness: The garlic is ready when the cloves are very soft, golden brown, and smell wonderfully aromatic. You can carefully unwrap one head and gently squeeze it – the cloves should easily yield to pressure and feel like soft butter. If they're still firm, re-wrap and continue roasting for another 10-15 minutes.
- Cool and Extract: Once roasted, remove the garlic from the oven and let it cool in its foil packet for 10-15 minutes. This makes it easier to handle and allows the residual heat to finish the cooking process. To extract the cloves, simply squeeze the bottom of the head, and the soft, roasted garlic will pop right out. Alternatively, use a small spoon or knife to scoop them out.
Mastering this simple technique is the foundation for countless delicious possibilities. For more advanced tips on infusing flavors and getting creative, check out roasted garlic how to - Article 2.
Exploring Other Methods: Air Fryer and Stovetop
While the oven is king for achieving perfectly roasted garlic, other methods can be employed depending on your equipment and time constraints.
Air Fryer Roasted Garlic
The air fryer offers a quicker alternative for those who love the convenience. The principle is similar to oven roasting, but cooking times are significantly reduced.
- Preparation: Prepare garlic heads the same way as for oven roasting (cut tops, drizzle with oil, season).
- Cooking: Wrap in foil. Place the foil packets in the air fryer basket. Cook at 350-375°F (175-190°C) for 20-30 minutes, checking for tenderness after 20 minutes. The exact time will depend on your air fryer model and garlic size.
The result is often comparable to oven roasting, with a slightly faster turnaround.
Stovetop Roasted Garlic (Individual Cloves)
While not ideal for whole heads, you can "roast" individual garlic cloves on the stovetop, often for a quick addition to a pan sauce or a small batch for immediate use.
- Preparation: Peel individual garlic cloves.
- Cooking: Heat a small skillet over medium-low heat. Add a tablespoon of olive oil. Add the peeled garlic cloves and cook gently, stirring frequently, until golden brown and tender, about 10-15 minutes. Be careful not to burn them, as this will make them bitter.
This method gives you a slightly different texture and flavor profile, more akin to confit garlic, but it's effective for small quantities.
Maximizing Your Roasted Garlic: Tips & Storage
Once you've mastered the roasted garlic how to technique, it's time to think about maximizing its potential and ensuring it lasts.
Pro Tips for Perfect Roasted Garlic:
- Choose Fresh Garlic: Look for firm, heavy heads without any green sprouts or soft spots. Fresh garlic roasts more evenly and tastes better.
- Don't Skimp on Oil: The olive oil is crucial for both flavor and preventing the garlic from drying out. A good quality extra virgin olive oil will impart a richer taste.
- Consider Seasonings: Beyond salt and pepper, try adding a sprig of fresh rosemary or thyme to the foil packet for an herbaceous aroma. A tiny splash of balsamic vinegar can also add a wonderful sweet tang.
- Don't Overcook: While you want the garlic tender, overcooking can lead to a slightly bitter taste. Keep an eye on it after the 35-minute mark.
- Experiment with Garlic Types: Different varieties of garlic (e.g., hardneck vs. softneck) can offer subtle differences in flavor and texture once roasted.
Storing Your Golden Treasure:
Roasted garlic is a perishable item, and proper storage is key to enjoying it safely.
- Refrigerator (Short-Term): Once cooled, you can store whole roasted garlic heads or extracted cloves in an airtight container in the refrigerator for up to 3-5 days. If stored submerged in olive oil, it can last a bit longer, but always be mindful of food safety regarding garlic in oil (see important note below).
- Freezer (Long-Term): For longer storage, mashed or pureed roasted garlic freezes beautifully. Place spoonfuls into ice cube trays, freeze until solid, then transfer the frozen cubes to a freezer-safe bag or container. It will keep for several months and can be thawed and used in soups, sauces, or spreads.
Important Food Safety Note: When storing roasted garlic submerged in oil at room temperature, there is a risk of botulism. Always store garlic in oil in the refrigerator and consume within a week, or freeze for longer storage. Never store homemade garlic in oil at room temperature.
Beyond the Basics: Creative Uses for Roasted Garlic
Now that you know how to roast garlic, what can you do with it? The possibilities are nearly endless!
- Spread it: Simply spread the creamy cloves directly onto crusty bread, toast, or crackers. It's a simple, elegant appetizer.
- Mash into Dips: Add mashed roasted garlic to hummus, guacamole, or white bean dips for an instant flavor boost.
- Elevate Sauces: Incorporate into pasta sauces, vinaigrettes, marinades, or gravies. Its mellow flavor is a game-changer.
- Enhance Vegetables: Toss roasted garlic cloves with roasted vegetables like potatoes, carrots, or asparagus before or after cooking.
- Soups and Stews: Stir a few cloves into creamy tomato soup, potato leek soup, or hearty stews for a deep, savory foundation.
- Compound Butter: Mash roasted garlic into softened butter with herbs for an incredible compound butter that's perfect for steaks, seafood, or garlic bread.
- Mashed Potatoes: Fold it into mashed potatoes for the ultimate comfort food side dish.
- Pesto & Spreads: Blend it into homemade pesto or other creamy spreads.
Once you master the basics of 'roasted garlic how to,' you might explore creative recipes and pairings mentioned in roasted garlic how to - Article 3.
Conclusion
Roasting garlic is more than just a technique; it's a revelation. This simple process transforms humble garlic into a sweet, mellow, and incredibly versatile ingredient that can elevate almost any dish. From its effortless preparation in the oven to its myriad culinary applications, understanding roasted garlic how to is a fundamental skill that will undoubtedly enrich your cooking repertoire. So grab a few heads of garlic, follow these easy steps, and prepare to embark on a delicious journey of flavor.
